Brewing Big Beer With Small Equipment

Too Much GrainThere is a special place in my heart for high gravity beer. Brewing it is even better. But sometimes your grain bill can exceed the capacity of your equipment. If you’ve already tried this I’m sure you’ll understand the frustration. You smack your yeast pack, get your strike water ready, and then… DOH! TOO MUCH GRAIN! First world problems I know. Don’t let that stop you 🙂 As long as you’ve got a decent pot there is still hope! Here are a few tips and techniques you can use to make big beers using small equipment.

1) Know Your Capacity

5 gallon mash tun

Hopefully you are reading this before you’ve already spilled grain all over the place. Knowing your mash tun’s capacity is CRUCIAL to make big beers. If you are trying to cram more than 13 pounds of grain into a 5 gallon mash tun you are in for a rude awakening 😉 Planning ahead when making a recipe, and taking into account the capacity of your mash tun will definitely reduce the amount cursing and last minute adjustments you’ll have to make to your batch. Here are some tools from the Green Bay Rackers Homebrew Club that will help you calculate the grain capacity needed for you recipes.

2) Make a Double Brew

what if i mashed with the wort from my mash

Ok, so your mind may not be completely blown by this concept, but it does actually work. Double brews involve mashing a normal batch, then pulling off your wort and heating it back up to mash with new grain. This means you can take an existing normal gravity recipe, and make an Imperial style by by mashing new grain with the wort you pulled from your first mash. I’ve tested this with a wheat recipe I make and had great results. I want to say that I had an OSG somewhere in the ballpark of ~1.110. Once you’ve pulled off your wort a second time, you can actually sparge again for a small beer. This is referred to as parti-gyle brewing. It will make for a long brew day, but you get 5 gallons of Imperial style beer along with 5 gallons of a session beer of the same style without maxing out your mash tun.

3) Extend Your Boil Time

add 30 minutes

Extend your boil from 60 minutes to 90 minutes. Extending your boil time causes more water to evaporate, and concentrates your wort which ultimately increases your OSG. Boil your wort for 30 minutes, and then add your hops on your normal hopping schedule. Just remember that your beer will be sweeter and will likely need more hops for the same bittering effect as a 60 minute boil to counter that sweetness. Usually big beers are mashed at a higher temperature. This helps increase body, but also leaves longer chains of sugars which are recognizably sweet. This works great on pretty much any batch. Apologies for the rampant meme use 🙂

3) Use A Yeast Starter and an Alcohol Tolerant Yeast

There’s a lot of sugars floating around in a big beer. The best thing you can do for your batch is make sure you have plenty of hungry yeast. I usually create a yeast starter by boiling a pint and a half of water along with 1/2 cup of light dry malt extract for about 3 minutes. Quickly cool this down to room temperature in the sink (I usually just put the lid on my pot and place it in a sink full of ice water), and then I pour it into a 2 Liter flask and pitch my yeast. If you have a stir plate it works out even better. If you don’t make a yeast starter, I would recommend using at least two yeast packets if not more. Remember, you want an army of yeast cells to take on a wort higher than 1.080. Here are some charts from Lugwrench Brewing Company showing the alcohol tolerance of Wyeast and White Labs yeast strains:

Wyeast LAbs - Alcohol Tolerance

White Labs Analysis - Alcohol Tolerance

The nICE Mug

nICE Mug - 1

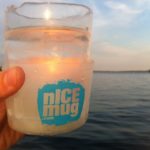
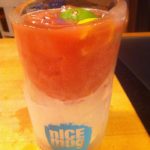
Inventor Glenn Auerbach and his group of friends have developed a reusable mold that creates a drinking mug made of ice. I can’t think of a better way to keep your beer cold. These glasses are a great idea, however there are some caveats. Air bubbles created during the freezing process can cause weak spots in the final product. Luckily, the makers of nICE mug have tips on making “clear” ice using distilled or reverse osmosis water, lemon oil drops, and/or the “double freeze” method. Glenn is raising funds on Kickstarter for its production, and you can also visit the nICE mug webpage here. A $20 pledge to their kickstarter page (between September 5th and October 8th) gets you an “Early Adopter Kit” including two molds and four nICE holds at half price. Best of luck Glenn!

Big Brew Day at Great Fermentations Revisted

Big Brew Day at Great Fermentations turned out to be a winner. Rain was expected in the forecast for the event, but after some slight spitting during the morning hours the sun decided to stick around the rest of the day. There were several notable events throughout the day including a brewing equipment “garage sale”, an introductory cheesemaking class, an off flavor seminar, Ask-A-Judge, and a class on making Sour beer. BBQ’n Fools was churning out some pretty fantastic smoked food including some excellent smoked bratwursts. At 1:00pm over 40 attendees participated in a global toast given by Mayor Greg Ballard. GF staff counted 25 batches brewed right in their parking lot, including a batch of mead. BIMP brewed a Wheat Wine and Dunkelweizen.

Although we were brewing somewhat outside of our comfort zones, GF offered burners, propane, filtered/RO water, and even a mobile wort chilling station (two daisy chained counterflow chillers, a couple of pumps, and a cart for transferring your hot wort to the chillers) to ease the stress of brewing away from your home setup. Another perk was that if you forgot any supplies or ingredients (WHAT WERE YOU THINKING!! ;)) all you had to do was head into the shop. We had a great time and wanted to thank Great Fermentations for putting on event, and everyone that hung out and celebrated National Homebrew Day with us. We are definitely looking forward to a bigger and better Big Brew next year!

Belgian White Recipe Revision

So uh… Hmmm… Mayonnaise? Hopefully I didn’t cause anyone too much grief on Monday when I posted my new recipe for a Belgian White. They say you can brew with just about anything, but mayonnaise has been a joke the writers at BIMP have been throwing around for years. Although we are no strangers to out of the ordinary brewing ingredients, we have not yet perfected our line of “aioli ales.” However… Now that we’ve had our fun, I have made a slight revision on the Belgian White recipe. Here’s the actual recipe for our BIMP Belgian White.

Belgian White - Recipe - Actual

Dry Hopped Bud Light?

Dry Hopped Bud Light - Bertus BreweryI know what you are thinking…. Mmmmmmm……DELICIOUS! Haha. Well in all seriousness, this actually is a great idea for peeps looking to improve their dry hopping skills/build a knowledge base on what multiple varieties of hops taste like when dry hopped. For ~$15 you can buy some premium quality American Lager (snicker ;)) and enough hops (roughly a gram each) to dry hop each bottle.  Scott from BertusBrewery.com did an excellent write up of his experiment with this process with a 12 pack of Bud Light. The beauty of this experiment is that Bud Light is so mild that the hops stand way out. Simply recap your bottles after adding each hop, and let them sit for a couple of days. You can crash out any free floating hop particles by letting your bottles sit overnight in the fridge. You can view the entire article on this process at BertusBrewery.com.


NoAdhesive Homebrew Labels

No-Adhesive-Beer-LabelI just stumbled across this product late last week. NoAdhesive.com has a great solution for homebrewers who would like to create their own beer labels. Its a super simple solution. You create your own label using whatever means you like (Beerlabelizer.comFreelabelmaker.com, MSPaint, Instagram,  or finger paint :)), then you print off the label, then you take your custom label and slip it under a NoAdhesive Label sleeve and dip it into boiling water to shrink wrap it to your bottle! The result is a professional looking beer label that will survive the scurge of any cooler you store your precious brews in.

[youtube=http://www.youtube.com/watch?feature=player_embedded&v=u6beInVHUwg]


Cleanup is great too. You don’t have to worry about wax or glue scumming up your bottles when you want to re-use them. Just cut off the old label and add a new one. Simple idea, but very useful for those that want to add a personal touch to their beer. No-Adhesive has a list of retailers you can purchase these sleeves through, but they will also send you a free sample if you are interested.